When you’re building, extending or renovating, one of the most overlooked but essential stages of the project is the floor screeding. It’s the layer that ensures your final flooring — whether it’s tiles, carpet, vinyl or wood — sits perfectly flat and lasts for years. Based in the UK, Tru Screed Ltd is a trusted, family-run business delivering professional screeding services across residential, commercial and industrial sites.
This guide explains what screeding is, why quality matters, and how Tru Screed delivers smooth, durable results every single time.
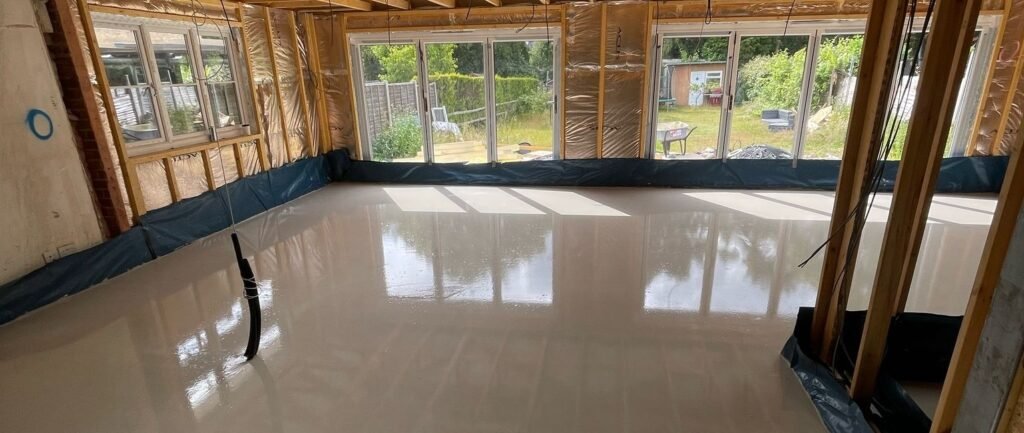
What is screeding?
Screeding is the process of applying a layer of material (usually cement-based or liquid) over a subfloor to create a smooth, level base for your final floor covering.
It’s a critical step between the structural floor and the visible surface — the hidden hero that determines whether your floor feels solid underfoot, looks flawless, and stands the test of time.
A good screed will:
- Provide a level, even surface for all types of flooring
- Encapsulate underfloor heating systems safely and evenly
- Distribute weight and traffic loads effectively
- Prevent cracking, sinking or uneven wear over time
Why professional screeding matters
Many homeowners underestimate the importance of this stage. Poorly laid screed can lead to uneven floors, cracking, or movement in tiles and finishes — often costing thousands to fix later.
Working with experienced professionals like Tru Screed Ltd means your floor base is:
- Level to exact tolerances — measured and tested before final finishes
- Installed using the right materials for your subfloor and environment
- Cured and dried correctly to avoid moisture damage
- Delivered on time by a qualified local team that understands site logistics
Our most popular screeding options
At Tru Screed Ltd, we work with a variety of high-performance screeds to suit every project — from new builds to renovations and extensions. Here’s a breakdown of the most common types we use:
1) Liquid Screed (Flowing Anhydrite Screed)
Also known as self-levelling screed, this modern material provides a smooth, flat surface that’s perfect for underfloor heating systems.
- Excellent thermal conductivity for efficient heat transfer
- Fast installation with large area coverage
- Reduced labour and quicker drying times
- Ideal for domestic and commercial spaces
2) Traditional Sand & Cement Screed
The classic choice for decades — durable, versatile and strong.
- Suitable for both bonded and unbonded applications
- Can be hand or machine applied
- Ideal for heavy-duty floors or areas needing falls and slopes
- Typically laid at 50–75mm thickness
3) Fast Drying Screed
Need to complete your project quickly? This specialist mix allows floor coverings to be laid in just a few days.
- Perfect for tight schedules or occupied properties
- High early strength
- Minimised risk of shrinkage or cracking
4) Fibre-Reinforced Screed
Fibres are added to improve tensile strength and reduce shrinkage cracking.
- Excellent for underfloor heating systems
- Ideal where additional durability is required
- Enhances long-term stability and resistance to stress
5) Polymer-Modified Screed
A high-strength option where thin sections are required.
- Strong adhesion to concrete substrates
- Suitable for areas needing fine tolerances or additional surface strength
- Commonly used in industrial and high-traffic environments
Our process — from quote to completion
Tru Screed Ltd follows a tried-and-tested process to ensure precision and quality at every stage:
- Initial Consultation
We assess your project requirements — area size, floor type, insulation, and heating systems — and advise on the most suitable screed option. - Preparation & Levelling
The base is cleaned, primed, and any insulation or membrane is laid. We then set precise levels using laser-guided equipment. - Screed Application
Depending on your chosen material, we either pump or manually lay the screed, ensuring full coverage and consistent depth. - Finishing
The surface is levelled to exact tolerance (SR1, SR2 or SR3 standards), depending on your floor type and intended finish. - Curing & Drying
Proper curing ensures the screed gains strength evenly and prevents cracking. For liquid screeds, we dehumidify or lightly sand once cured to remove laitance. - Quality Check & Handover
We carry out final surface tests and moisture checks before handing over the area for your flooring contractor to begin work.
Screeding and underfloor heating — the perfect match
One of the most common questions homeowners ask is how screed works with underfloor heating (UFH).
At Tru Screed, we specialise in screeds that are thermally efficient — they encapsulate the heating pipes perfectly, ensuring even heat distribution across the entire room.
Benefits include:
- Faster heat-up times and consistent room warmth
- Better energy efficiency (especially with liquid screed)
- Longer system lifespan due to even coverage
- Reduced cracking risks from expansion and contraction
We coordinate directly with your heating installer to make sure everything runs smoothly from prep to pour.
Domestic and commercial expertise
Whether you’re a homeowner working on a small extension or a developer overseeing a multi-unit build, Tru Screed provides the same attention to detail across every project.
For homeowners:
- Perfectly level floors for kitchens, extensions and renovations
- Underfloor heating screeds with smooth finishes
- Fast turnaround and minimal disruption
For contractors and developers:
- Reliable scheduling and on-site coordination
- Experienced crews who understand site safety
- Consistent results across large commercial and residential projects
The Tru Screed difference
We’re proud to be a family-run business that values trust, reliability and craftsmanship. When you choose Tru Screed, you’re not just hiring a contractor — you’re partnering with a local team that cares about quality and reputation.
Here’s what sets us apart:
- Personal service from quote to completion — no call centres, no confusion
- Highly trained, fully insured professionals on every job
- Clean, efficient work with minimal disruption
- Modern equipment for precision levelling and consistent finish
- Transparent pricing — honest quotes with no hidden extras
How to prepare for your screed installation
A little preparation helps everything run smoothly:
- Ensure the area is clear of debris, dust and materials.
- Confirm plumbing and electrical work under the floor is complete.
- Make sure the site is watertight to prevent moisture issues.
- Allow access for delivery and pumping equipment.
If you’re unsure about readiness, just ask — we’ll guide you step by step.
Aftercare and maintenance tips
- Avoid heavy foot traffic until the screed has fully cured.
- Maintain ambient temperatures for consistent drying.
- Do not overheat underfloor systems too soon — follow the gradual warm-up process.
- Keep ventilation moderate — avoid forced drying with heaters.
- Check moisture levels before applying floor coverings.
Following these steps helps guarantee the best long-term performance from your screed and flooring.
Frequently asked questions
How long does screed take to dry?
It depends on the type: traditional screeds dry at roughly 1mm per day, while liquid and fast-drying screeds can be ready for light foot traffic in 24–48 hours.
Can you pour screed in winter?
Yes, with correct site preparation and temperature control. We use additives and curing methods to manage cold-weather pours.
How thick should my screed be?
Typically 50–75mm for most domestic floors, or 30–40mm with liquid screed over insulation and UFH systems.
What’s the difference between bonded and unbonded screed?
Bonded screed adheres directly to the concrete substrate — ideal for thinner sections. Unbonded screed sits on a membrane or insulation layer, allowing for better thermal performance and movement tolerance.
Ready for a flawless finish?
At Tru Screed Ltd, we believe in doing things properly — every mix measured, every level checked, every finish perfected. Whether you’re planning a home renovation or managing a large construction site, our small, dedicated team delivers big results with personal service and precision craftsmanship.

